Old mac, new blood

25 April 2023

OpenCore Legacy Patcher

šŸ³ dortania.github.io/OpenCore-Legacy-Patcher/

Follow instructions to install the latest compatible macOS on your old Mac.

  1. The first step of ensuring whether your model is supported is by checking the Supported Models page.
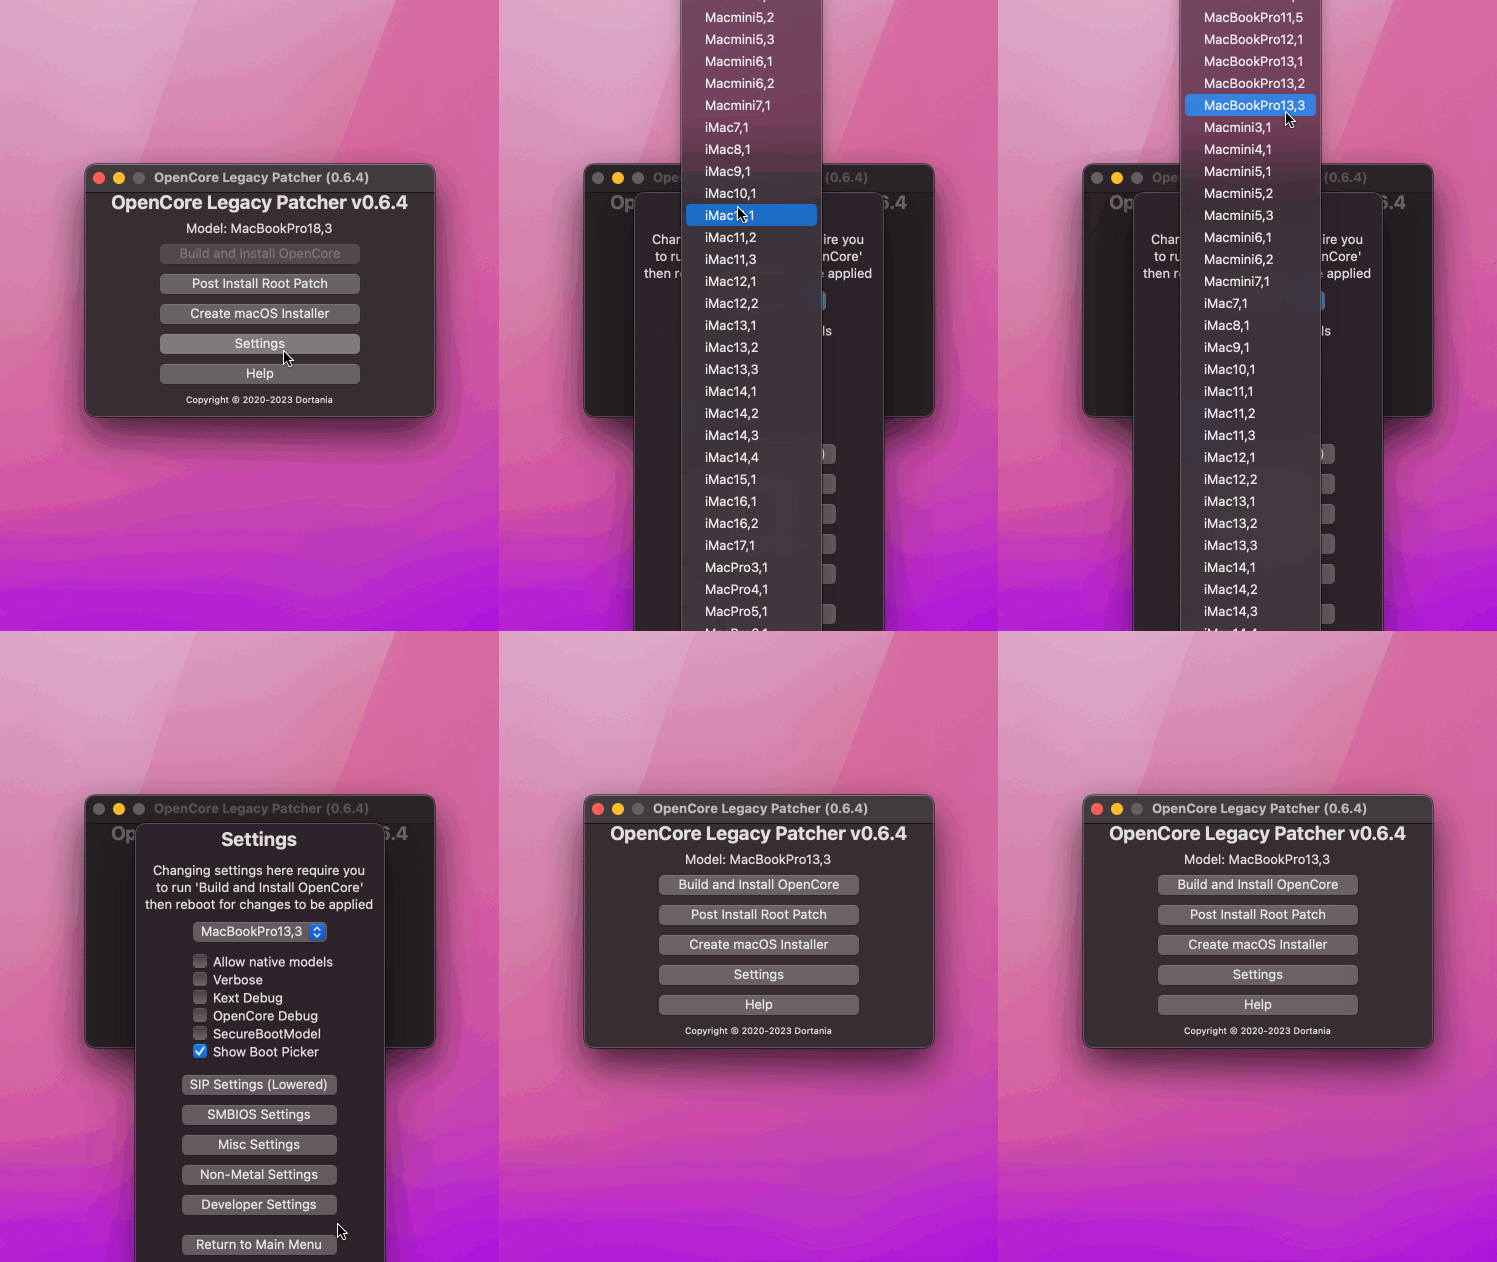
  2. Download and build macOS Installer

    Make sure you change the target model in settings if building from a different mac.

  3. Run the OpenCore-Patcher.app
  4. Reboot and boot OpenCore

    Use the Disk Utility tool first to leave a blank partition for Ubuntu installation later.

  5. Post-Installation

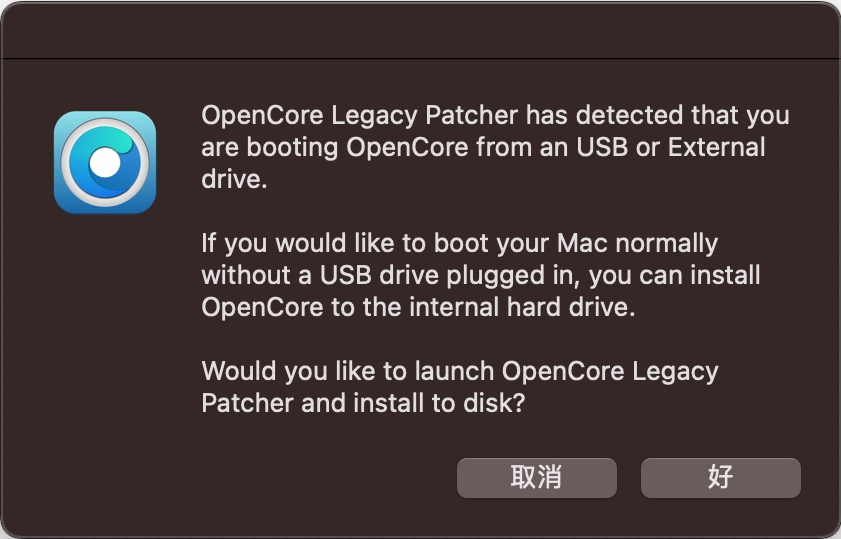
    Once youā€™ve booted into macOS for the first time, you will see the below message after a few seconds. It lets you install OpenCore to your internal drive, allowing you to boot without USB.

Have a read on OpenCore Multiboot. One disk - multiple OSes senario is picked for booting Linux on the same machine.

Ubuntu installation

  1. Download Ubuntu Desktop
  2. Use balenaEtcher to flash the image to a USB drive
  3. Boot into Ubuntu from the USB drive
  4. Follow usual steps until custom disk partition

    Format the blank partition to EXT4 (or whatever other FS you prefer) and make sure you choose the same EFI partition for where the bootloader will be installed (this should NOT ā€œdeleteā€ OpenCore in any shape or form) and install.

  5. Install as usual

Dualbooting with OpenCore

The easiest method is using OpenLinuxBoot described in Dualbooting with Linux.

  1. Boot into macOS
  2. Download the ext4_x64.efi driver from acidanthera/OcBinaryData.
  3. Mount EFI Partition with Terminal. See explainations here

    # find the EFI partition
    diskutil list 
    
    # mount the EFI partition
    sudo diskutil mount /dev/disk0s1 
    
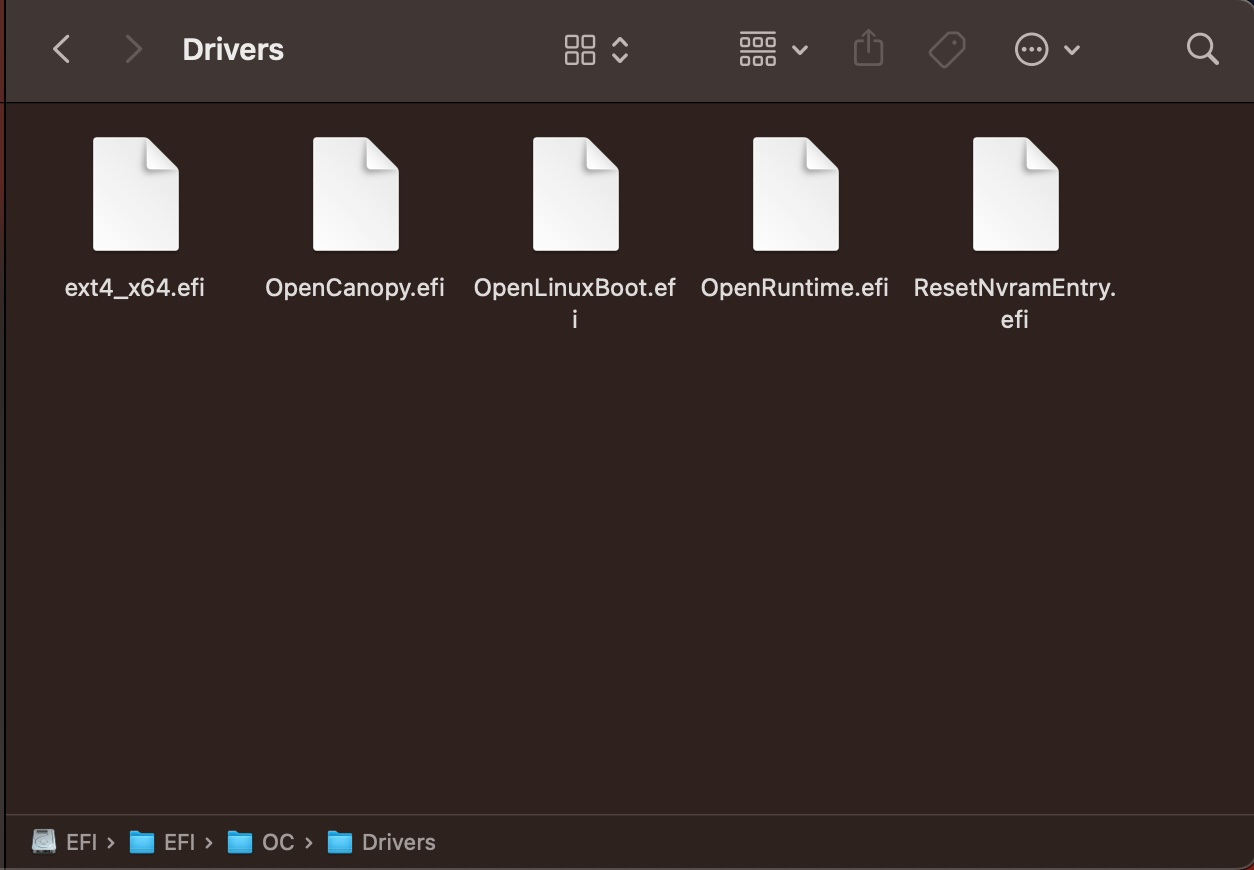
  4. Copy the ext4_x64.efi driver to the EFI partition under EFI/OC/Drivers/. You should also see the OpenLinuxBoot.efi driver already included.

  5. Edit EFI/OC/config.plist Online with galada.gitee.io/opencoreconfiguratoronline

    • UEFI -> Quirks -> RequestBootVarRouting = YES
    • Misc -> Boot -> LauncherOption = Full
    • UEFI -> Drivers -> Add ext4_x64.efi
  6. Replace EFI/OC/config.plist with the edited one, unmount the EFI partition

     # unmount the EFI partition
     sudo diskutil unmount /dev/disk0s1 
    
  7. Reboot into OpenCore, installed Linux should appear

Todo Apps: My Personal Workflow

12 April 2023

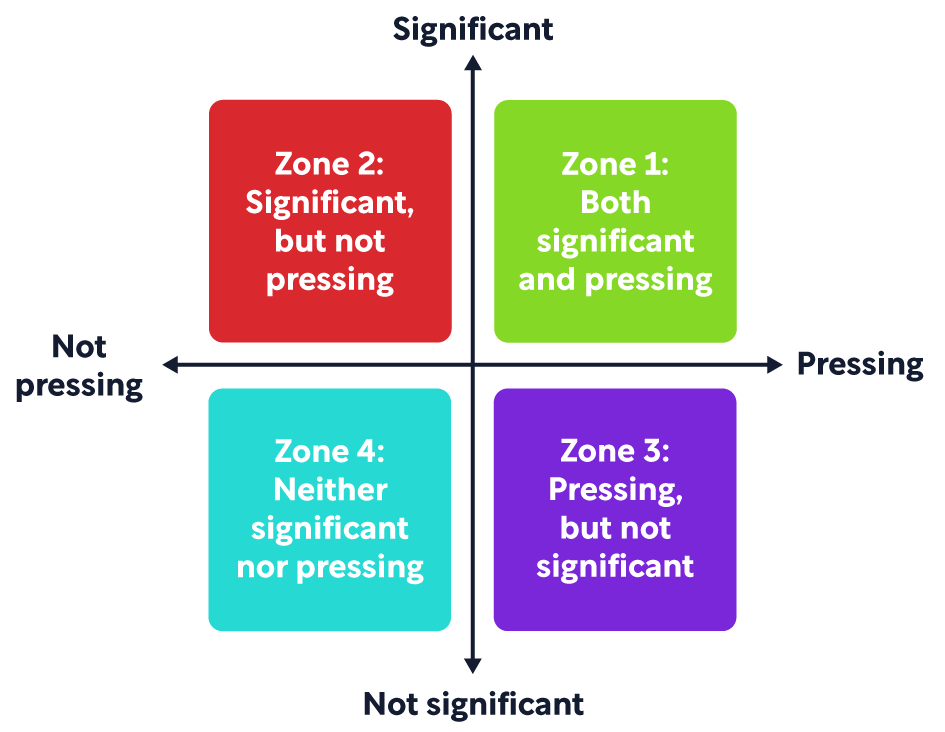
Iā€™m borrowing the idea of significance vs pressure from First Things First by Stephen R. Covey. It emphasizes the importance of prioritizing tasks based on their significance, not their urgency. Itā€™s a great way to avoid getting distracted by the urgent tasks that are not important.

firstthingsfirst_graph

With the above graph in mind, Iā€™m sorting my daily and long-term tasks into different apps based on their significance and frequencies.

MinimaList: Scheduled Daily Tasks

I use MinimaList as a habit building and focus app that helps turn long-term goals into small daily tasks. By breaking down a significant long-term project into insignificant daily chunks, it becomes more manageable and achievable. This iOS MinimaList with its free tier is enough for my use case. Free tier allows only a single list, notifications and a built-in pomodoro timer.

Example daily tasks:

  • Language Transfer app for Spanish learning (20 mins)
  • Toucan app for learning new Spanish words (5 mins)
  • Readwise app for reviewing highlights (10 mins)
  • Shortform app for new books (20 mins)
  • Journaling (10 mins)

Todoist: Things to forget

Todoist free tier has limited features, without notifications specifically.

I use it to keep items in the Neither significant nor pressing category, but they still need to be done eventually. These tasks may include things like scheduling hospital appointments that are several months away or other similar responsibilities that are not a top priority, but still require attention in advance. By keeping track of these items, I can avoid forgetting about them and prevent them from becoming a source of stress later on.

I usually add task dates that are ahead of deadlines by a few days to give myself some buffer time. Or in other instances, I add items to simply allow myself to remove the stress of trying to remember them, such as a shopping list that will be picked up when Iā€™m in the store actually doing shopping.

Example tasks:

  • An inbox task list before sorting
  • monthly or annual todos
  • subscription renewals
  • second hand items to sell
  • shopping lists
  • quota/allowance tracker - monthly junk food quota
  • race calendar reminders - datetime to enrol etc

Notion: 2nd brain

Notion is a powerful tool that can be used for a variety of purposes. Itā€™s not a strict todo list app for me. But having your to-do list items close to their context is essential for efficient and effective task management. I have todo lists scattered in different Notion pages, such as Engineering Wiki, Readwise book highlights, Journals, etc.

Plus, Notionā€™s flexibility means you can add details and attachments to each task, such as notes, files, and links, making it easier to research tasks and complete them quickly.

Calendars: Time blocking and tracking

By blocking a slot of time in calendar, it kind of removes the friction of starting a task. With the sync between Todoist and Google Calendar, I can also revisit a specific date to see what Iā€™ve done on that day. When journaling in Notion, I also prefer to use the calendar view to plan my todo items for the day or days ahead.

Goodreads: Book tracking

Goodreads is a social network for book lovers. I use it to keep track of the books Iā€™ve read and want to read. Itā€™s also a great place to find new books to read. I also use it to keep track of my reading progress. I have a goal to read 24 books in 2023. Iā€™m currently on track to achieve it.

Hyper CapsLock Unified

19 May 2022

Hyper CapsLock Unified

https://github.com/darkato42/Capslock

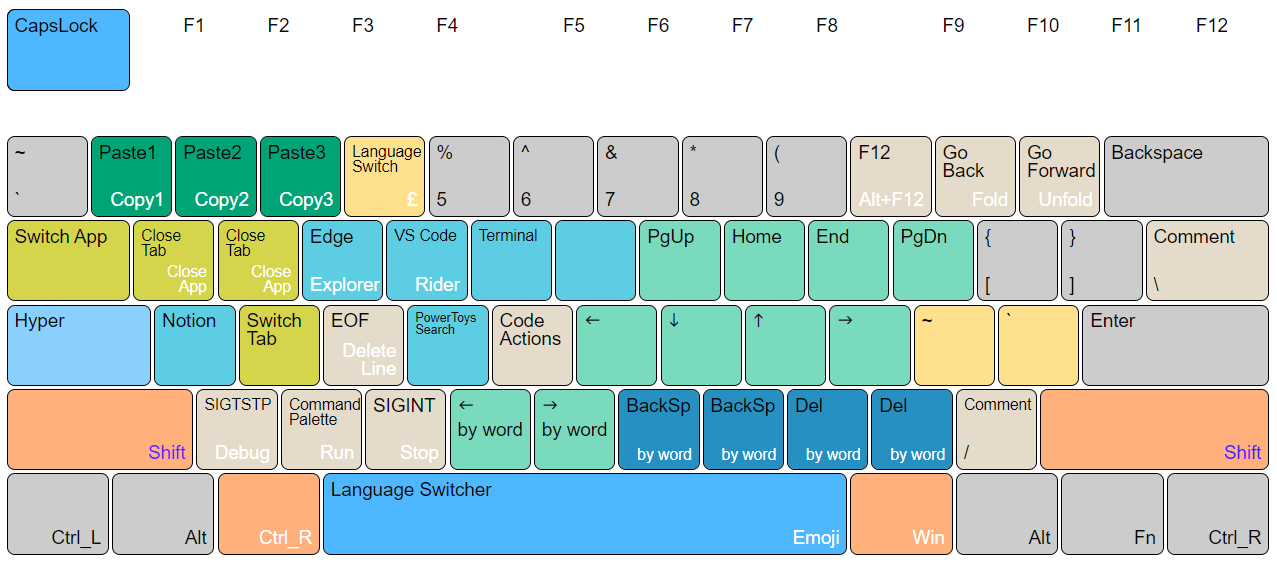
Iā€™m an user switching between my work PC and my personal Mac for different coding projects. My goal is to create configurations so I can have almost identical experiences when on MacOS and Windows, with or without my small external ANSI 60 keyboard.

Highlights

Based on Vonng/Capslock, some extra features are introduced:

  • Consistent shortcut combinations between MacOS and Windows with different keyboard layouts.
  • Duplicated key combos for a greater redundancy, less typo and ease of use.
  • Simplified to have only one extra modifier, the left Cmd key, when Hyper is used.
  • Removed hard to reach and less used key combinations for better ergonomics.
  • Remapped the app launch keys accoding to their initials.
  • Remapped frequent IDE functions to keys with close semantic meanings, such as - and + for Fold and Unfold.
  • Remapped #, Ā£, ` and ~, so they are typed in consistent fashions across keyboard and OS.

ANSI 60 Key and Keycap change

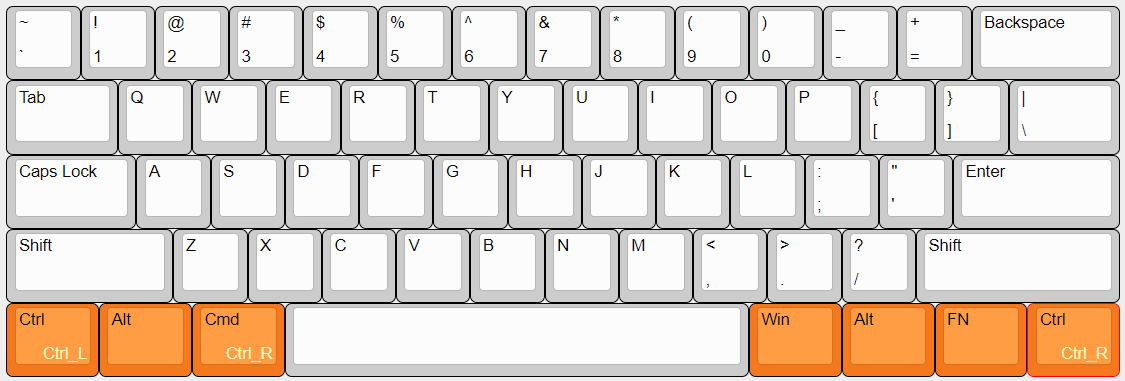
My external keyboard has a small ANSI 60 keys layout that is different from both my Mac and Windows laptopā€™s UK ISO keyboards. Itā€™s reprogrammed with firmware to have the left modifier keys (Ctrl/Win/Alt) swapped to (Ctrl_L/Alt/Ctrl_R) to allow the same finger positions for the same Hyper shortcuts defined in both MacOS and Windows.

ansi-60


CapsLock Enhancement Windows

The additional Ctrl_R key gives a close āŒ˜ experience when in Windows, While the original Ctrl_L key on the left makes Windows users feel at home by keeping Windows Ctrl+ shortcuts unchanged.

Only the top Hyper+ layer are kept for the middle T, G, V and B keys because they are difficult to reach for the Hyper+Ctrl+ layer.

hyper-win


CapsLock Enhancement Mac

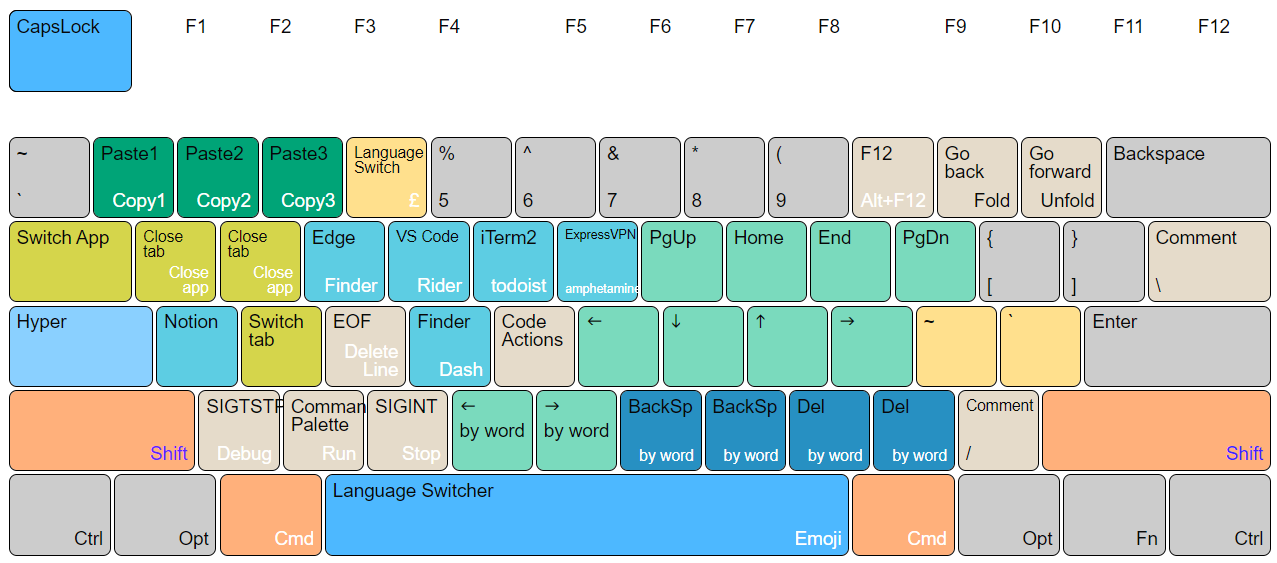
Mac keyboard layout is designed slightly different than normal ANSI/ISO layouts. Its wider and slighly left moved āŒ˜ key is more ergonomics for usual āŒ˜+C or āŒ˜+V. And it allows slighly easier reach for T, Y, G, V and B keys when CapsLock and āŒ˜ are both pressed.

Use Karabiner-Elementsā€™s simple rule to change Ctrl_R to Cmd_L for the external ANSI keyboard only. All other complex rules defined in the JSON file can then be loaded for consistent Hyper features.

hyper-mac

Installation

It only takes two steps to enable Capslock on your Mac: Download & Enable

  1. Download

    Download & Install Karabiner-Elements.

    Following the wizard and grant required permissions (Settings - Security - Privacy)

  2. Enable

    Open this link with Safari. It will launch Karabiner-Elements and import the configuration.

    karabiner://karabiner/assets/complex_modifications/import?url=https://raw.githubusercontent.com/darkato42/Capslock/master/mac/capslock.json

    Click Enable All on pop-up dialog. It will affect immediately.

    You can now try moving cursor with ā‡Ŗ + h,j,k,l.

Optimised Notion Keyboard Shortcuts

18 May 2022

Must-know Default Keyboard Shortcuts

  • PressĀ cmd/ctrlĀ +Ā NĀ to create a new page in workspace root (desktop apps only)
  • PressĀ cmd/ctrlĀ +Ā PĀ to open search or jump to a recently viewed page
  • PressĀ cmd/ctrlĀ +Ā [Ā to go back a page (same for any pages in browser)
  • PressĀ cmd/ctrlĀ +Ā ]Ā to go forward a page (same for any pages in browser)
  • PressĀ cmd/ctrlĀ +Ā DĀ to duplicate current block
  • PressĀ cmd/ctrlĀ +Ā EĀ to mark selection as code
  • PressĀ cmd/ctrlĀ +Ā KĀ to add a link to a text selection
  • PressĀ escĀ to select the block youā€™re currently in. Or to clear selected blocks.
  • TypeĀ ---Ā to create a divider. (Three dashes in a row.)
  • Duplicate any content on a Notion page by holding downĀ option/altĀ as you drag and drop.
  • TypeĀ :Ā to search and add in-line emoji

šŸ’” Tip: You can also bring up your computerā€™s emoji picker with the shortcut.

Mac:Ā ctrlĀ +Ā cmdĀ +Ā spaceĀ or Fn(šŸŒ) + E

Windows: windows keyĀ +Ā .orĀ windows keyĀ +Ā ;Ā on Windows.

My Optimised Keyboard Shortcuts

To highlight text with the last used color in Notion is a bit cumbersome, which requires several mouse movements in different directions. And its default shortcut combinationĀ cmd/ctrlĀ + shift +Ā H is not ergonomic to press together.

Add favicon to a Jekyll site

19 January 2022

result

1. Create favicon using online tools

Itā€™s very easy to create a simple favicon asset using favicon.io or websiteplanetā€™s favicon generator.

2. Unzip the package and rename the chosen file

favicon_io

Rename favicon-32x32.png to favicon.png and copy the file into root folder of your Jekyll repository.

Add <link rel="shortcut icon" type="image/png" href="/favicon.png">

into ./_includes/head.html


<head>
	<title>{% if page.title %}{{ page.title }} | {% endif %}{{ site.title }}</title>
	<meta charset="utf-8" />
	<meta name="viewport" content="width=device-width, initial-scale=1, user-scalable=no" />
	<!--[if lte IE 8]><script src="{{ "assets/js/ie/html5shiv.js" | relative_url }}"></script><![endif]-->
	<link rel="stylesheet" href="{{ "assets/css/main.css" | relative_url }}" />
	<!--[if lte IE 9]><link rel="stylesheet" href="{{ "assets/css/ie9.css" | relative_url }}" /><![endif]-->
	<!--[if lte IE 8]><link rel="stylesheet" href="{{ "assets/css/ie8.css" | relative_url }}" /><![endif]-->
	<link rel="shortcut icon" type="image/png" href="/favicon.png">
</head>

head.html is likely being used in all your html layouts similar to the below.


<!DOCTYPE html>
<html>

{% include head.html %}

<body>

	{% include header.html %}

	<!-- Main -->
	<div id="main" class="alt">

		<!-- One -->
		<section id="one">
			<div class="inner">
				<header class="major">
					<h1>{{ page.title }}</h1>
				</header>
				<blockquote>
					<p>{{ page.description}}</p>
				</blockquote>

				{{ content }}
			</div>
		</section>

	</div>

	{% include footer.html %}

</body>

</html>

My .gitconfig

08 January 2022

To keep it short, use cases arenā€™t included in this post.

Ignore files for all repos

  1. Create a ~/.gitignore_global file with these contents:
*~
.DS_Store
  1. run git config --global core.excludesfile ~/.gitignore_global

Line ending

On a Windows machine, set core.autocrlf to true ā€“ this converts LF endings into CRLF when you check out code:

git config --global core.autocrlf true

On a Linux or Mac system that uses LF line endings, then you donā€™t want Git to automatically convert them when you check out files; however, if a file with CRLF endings accidentally gets introduced, then you may want Git to fix it. You can tell Git to convert CRLF to LF on commit but not the other way around by setting core.autocrlf to input:

git config --global core.autocrlf input

Git LFS

git lfs install

# For repo with filesize > 128MB
git config http.version HTTP/1.1

There are some drawbacks on performance if HTTP/1.1 is applied to global config.

git config --global --add http.version HTTP/1.1

ref:

HTTP/2 vs. HTTP/1.1: How do they affect web performance?

Git Aliases

  • Run e.g. git config --global alias.co checkout to add co as an alias for checkout
  • Or edit the ~.gitconfig file directly

      [filter "lfs"]
      	process = git-lfs filter-process
      	required = true
      	clean = git-lfs clean -- %f
      	smudge = git-lfs smudge -- %f
      [user]
      	name = Yulin Wu
      	email = [email protected]
      [alias]
      	st = status
      	co = checkout
      	br = branch
      	unstage = reset HEAD --
      	last = log -1 HEAD
      	# adds all modified files to staging and allows you to type a commit message, e.g. git ac "updated README"
      	ac = !git add -A && git commit -m
    

To run an external command, rather than a Git subcommand. In that case, you start the command with a ! character. This is useful if you write your own tools that work with a Git repository. We can demonstrate by aliasing git visual to run gitk:

$ git config --global alias.visual "!gitk"

My MacOS .gitconfig

[filter "lfs"]
	process = git-lfs filter-process
	required = true
	clean = git-lfs clean -- %f
	smudge = git-lfs smudge -- %f
[user]
	name = Yulin Wu
	email = [email protected]
[alias]
	st = status
	co = checkout
	br = branch
	unstage = reset HEAD --
	last = log -1 HEAD
	# adds all modified files to staging and allows you to type a commit message, e.g. git ac "updated README"
	ac = !git add -A && git commit -m
[core]
	autocrlf = input

SOLID Principle with C# Examples

22 November 2018

The following notes are taken while reading this post on codeproject. Code examples are directly from the post.

About SOLID

  • S: Single responsibility principle (SRP)
  • O: Open closed principle (OCP)
  • L: Liskov substitution principle (LSP)
  • I: Interface segregation principle (ISP)
  • D: Dependency injection principle (DIP)

Single responsibility principle (SRP)

A bad example that Employee class takes two responsibilities of employee database operation and employee report generation.

namespace SRP
{
    public class Employee
    {
        public int Employee_Id { get; set; }
        public string Employee_Name { get; set; }

        /// <summary>
        /// This method used to insert into employee table
        /// </summary>
        /// <param name="em">Employee object</param>
        /// <returns>Successfully inserted or not</returns>
        public bool InsertIntoEmployeeTable(Employee em)
        {
            // Insert into employee table.
            return true;
        }
        /// <summary>
        /// Method to generate report
        /// </summary>
        /// <param name="em"></param>
        public void GenerateReport(Employee em)
        {
            // Report generation with employee data using crystal report.
        }
    }
}

According to SRP, one class should take one responsibility so we should write one different class for report generation, so that any change in report generation should not affect the ā€˜Employeeā€™ class.

namespace SRP
{
    public class Employee
    {
        public int Employee_Id { get; set; }
        public string Employee_Name { get; set; }

        /// <summary>
        /// This method used to insert into employee table
        /// </summary>
        /// <param name="em">Employee object</param>
        /// <returns>Successfully inserted or not</returns>
        public bool InsertIntoEmployeeTable(Employee em)
        {
            // Insert into employee table.
            return true;
        }
    }
    
    public class ReportGeneration
    {
         /// <summary>
         /// Method to generate report
         /// </summary>
         /// <param name="em"></param>
         public void GenerateReport(Employee em)
         {
             // Report reneration with employee data.
         }
    }
}

N.B. In practice, for projects I worked on, a repository pattern could be used here for CRUD database operations for Exployee entities. Therefore, you will have a simple POCO class for Employee class objects. And database operations are in the repository layer, for example EmployeeRepo.

Open closed principle (OCP)

Open for extension but closed for modification.

A bad example with too many ā€˜IFā€™ statements. Everytime when we want to introduce another new report type like ā€˜Excelā€™, then another ā€˜IFā€™ is required.

public class ReportGeneration
{
    /// <summary>
    /// Report type
    /// </summary>
    public string ReportType { get; set; }

    /// <summary>
    /// Method to generate report
    /// </summary>
    /// <param name="em"></param>
    public void GenerateReport(Employee em)
    {
        if (ReportType == "CRS")
        {
             // Report generation with employee data in Crystal Report.
        }
        if (ReportType == "PDF")
        {
            // Report generation with employee data in PDF.
        }
     }
 }

Define a base type ReportGenerationBase that every types of report can inherit from. So the ReportGenerationBase is open for extension but also closed for modification.

The virtual keyword allows the method to be overridden by any class that inherits it.

public class ReportGenerationBase
{
    /// <summary>
    /// Method to generate report
    /// </summary>
    /// <param name="em"></param>
    public virtual void GenerateReport(Employee em)
    {
        // From base
    }
}
/// <summary>
/// Class to generate Crystal report
/// </summary>
public class CrystalReportGeneraion : IReportGeneration
{
    public override void GenerateReport(Employee em)
    {
        // Generate crystal report.
    }
}
/// <summary>
/// Class to generate PDF report
/// </summary>
public class PDFReportGeneraion : IReportGeneration
{
    public override void GenerateReport(Employee em)
    {
        // Generate PDF report.
    }
}

Liskov substitution principle (LSP)

Child class should not break parent classā€™s type definition and behavior. Another interesting thing to pay attention to is mutability when discussing LSP.

A classic example is Rectangle and Square.

// A base class of Rectangle with **virtual** properties. 
public class Rectangle 
{
    public virtual int Height { get; set; }
    public virtual int Width { get; set; }
}

public class Square : Rectangle
{
    private int _height;
    private int _width;
    public override int Height
    {
        get
        {
            return _height;
        }
        set   // Here is the main problem: Exposing the set method makes the Square class mutable
        {
            _height = value;
            _width = value;
        }
    }
    public override int Width
    {
        get
        {
            return _width;
        }
        set
        {
            _width = value;
            _height = value;
        }
    }
}

public class AreaCalculator
{
    public static int CalculateArea(Rectangle r)
    {
        return r.Height * r.Width;
    }

    public static int CalculateArea(Square s)
    {
        return s.Height * s.Height;
    }
}

[TestMethod]
public void TwentyFourfor4x6RectanglefromSquare()
{
    Rectangle newRectangle = new Square();
    newRectangle.Height = 4;
    newRectangle.Width = 6;
    var result = AreaCalculator.CalculateArea(newRectangle);
    Assert.AreEqual(24, result);    // Behaviour is broken for the parent Rectangle class.
}

The fix is shown below using the abstract class Shape

public  abstract class Shape
{
    public abstract int Area();
}

public class Rectangle :Shape
{
    public  int Height { get; set; }
    public  int Width { get; set; }
    public override int Area()
    {
        return Height * Width;
    }
}

public class Square : Shape
{
    public int Sides { get; set; };
    public override int Area()
    {
        return Sides * Sides;
    }
}

Then with Shape, Rectangle and Square are not parent and child relationship anymore. They can only have that relationship when the objects created are immutable. Therefore, a square is a rectangle and always will be.

Interface segregation principle (ISP)

Any client should not be forced to use an interface which is irrelevant to it.

Bad code example:

public interface IEmployee
{
    bool AddEmployeeDetails();  // Applicable to all employee types
    bool ShowEmployeeDetails(int employeeId);   // Only apply to Permanent Employees
}

public class PermanentEmployee : IEmployee
{
    bool AddEmployeeDetails() {
        // Implementation goes here.
    }
    bool ShowEmployeeDetails(int employeeId) {
        // Implementation goes here.
    }
}

public class NonPermanentEmployee : IEmployee
{
    bool AddEmployeeDetails() {
        // ...
    }
    bool ShowEmployeeDetails(int employeeId) {
        // N/A to this class.
    }
}

With only one interface for both types of employees, the NonPermanentEmployee class is forced to implement the method of ShowEmployeeDetails(int employeeId). To correct it, we can split the responsibilities of Add and Show into two interfaces.

Fix:

public interface IAddOperation
{
    bool AddEmployeeDetails();
}
public interface IGetOperation
{
    bool ShowEmployeeDetails(int employeeId);
}

public class PermanentEmployee : IAddOperation, IGetOperation
{
    // ...
}

public class NonPermanentEmployee : IAddOperation
{
    // ...
}

Dependency inversion principle (DIP)

https://www.exceptionnotfound.net/simply-solid-the-dependency-inversion-principle/

This principle is primarily concerned with reducing dependencies amongst the code modules. The DIP is comprised of two rules:

  • High-level modules should not depend on low-level modules. Both should depend on abstractions.
  • Abstrctions should not depend on details. Details should depend on abstractions.

Another classic/trite example is building a notifications client that is able to send email and SMS text notifications.

Bad example with highly coupled code using concrete classes.

public class Email
{
    public string ToAddress { get; set; }
    public string Subject { get; set; }
    public string Content { get; set; }
    public void SendEmail()
    {
        //Send email
    }
}

public class SMS
{
    public string PhoneNumber { get; set; }
    public string Message { get; set; }
    public void SendSMS()
    {
        //Send sms
    }
}

public class Notification
{
    private Email _email;
    private SMS _sms;
    public Notification()
    {
        _email = new Email();
        _sms = new SMS();
    }

    public void Send()
    {
        _email.SendEmail();
        _sms.SendSMS();
    }
}

Fix: Introduce an abstration that Notification can rely on and that Email and SMS can implement.

public interface IMessage
{
    void SendMessage();
}

// Email and SMS can implement IMessage
public class Email : IMessage
{
    public string ToAddress { get; set; }
    public string Subject { get; set; }
    public string Content { get; set; }
    public void SendMessage()
    {
        //Send email
    }
}
public class SMS : IMessage
{
    public string PhoneNumber { get; set; }
    public string Message { get; set; }
    public void SendMessage()
    {
        //Send sms
    }
}

// Make Notification depend on the abstraction IMessage rather than its concrete implementations
public class Notification
{
    private ICollection<IMessage> _messages;

    // Constructor Injection
    public Notification(ICollection<IMessage> messages)
    {
        this._messages = messages;
    }
    public void Send()
    {
        foreach(var message in _messages)
        {
            message.SendMessage();
        }
    }
}

There are 3 types for doing DI, Constructor Injection, Property Injection and Method Injection. It feels to me the Constructor Injection is the most intuitive one which can be achieved via SimpleInjector etc. I havenā€™t got too much experiences in terms of the other two.
Object-Oriented Programming Fundamentals

14 September 2017

Four Pillars of OOP:

  1. Encapsulation
  2. Abstraction
  3. Inheritance
  4. Polymorphism

Encapsulation

Encapsulation is a process of binding data members (variables, properties) and member functions (methods) together. In OOP, we achieve encapsulation through Class.

Abstraction

Abstraction is the process of showing only essential/necessary features of an entity/object to the outside world and hide the other irrelevant information.

Inheritance

The process of creating the new class by extending the the existing class is called inheritance or the process of inheriting the features of base class is called as inheritance.

Polymorphism

Poly means many and Morph means forms. Polymorphism is the process in which an object or function take different forms. It is a feature, which lets us create functions with same name but different arguments, which will perform differently. That is function with same name, functioning in different way. Or, it also allows us to redefine a function to provide its new definition.